|
|
|
Categories
|
|
Information
|
|
Featured Product
|
|
|
 |
|
|
There are currently no product reviews.
 ;
Good copy and great customer service! There was some confusion with my order and it was resolved promptly!
;
Having bought a pre-owned Sony FM stereo tuner through eBay, it came without any manuals. It soon became clear that to get the best from this excellent tuner I needed a decent manual because much of the operation was not intuitive to a newboy to hi fi like me. I managed to download the official Sony multi-lingual manual from Owner-Manuals.com with no problem at all - a really quick and easy service. I'm very glad I did because I found out all the operations of the tuner and was then able to not only set it up quickly but also to get much more from it that poke-and-hope trialling would ever achieve. In my book $4.99 very well spent.
;
This manual is immaculate in it's accuracy. Everything is written very clearly and easy to understand. Written by a professional who wants to convey a clear and easy to understand message!!
;
This Manual (as downloaded) is both informative and comprehensive and has proved to be extremely useful. thoroughly recommended.
;
everything is ok, thank you very much! Product is good, no problems with download!
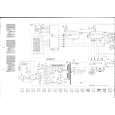
400RB-IV Series
Front Panel Controls
Front Panel Controls
1-Balanced Direct Out: An electronically balanced output, that you can run to your P.A. system. 2-Ground/Lift: This switch disconnects the ground on the balanced, XLR output to eliminate hum and buzz when connnecting to equipment that is running on a different ground system. Pre/Post EQ Button: Selects the direct out signal before or after the EQ. 3-Input: A standard ¼� input jack to plug in active or passive basses using a shielded cord. 4- -14dB Pad: Input attenuator button. The button is generally left out, except in rare cases when the clip LED flashes. This switch should be pressed if the CLIP LED stays on continuously. It may be necessary to �pad� the input if you are using a bass with active electronics or very high output. Clip LED: LED lights yellow when the input stage is being over-driven. If -14dB PAD is pressed and clip LED still stays lit, turn down the volume on your bass. Tuning Mute Button: Set this switch to �On� when tuning up. No signal will be sent to the speakers, or the P.A. system. Mute LED: LED turns on when �Tuning Mute� is switched to the �ON� position. 5-Volume: Sets pre-amp gain after the input stage. It is used in conjunction with the input pad, to optimize the amplifier�s headroom. 6-Voicing Filters: 4/5 String Bass: Setting this button to the �ON� position, voices the pre-amp for basses with �B� tuning (5 string bass). Leaving it in the �Out� position will voice the amp like the 800RB, for a 4 string bass. Contour: Drops the mid-range frequencies while boosting lows & highs. Presence: Adds edge and definition to higher frequencies. Active Equalization: 7-Treble: Boost and cut at 7 kHz +14dB shelving type. Add or remove edge and definition. 8-High Mid: Boost and cut at 1 kHz +6dB/ -10dB, �Q Optimized,� band pass type. Works on lower string harmonics, and effects the punch of your sound. 9-Low Mid: Boost and cut at 250Hz +6dB/-10dB, �Q Optimized,� band pass type. Works on the main body of your sound. 10-Bass: Boost and cut at 60Hz +10dB, shelving type. Controls low end push. 11-Boost: A post EQ gain stage using GIVE technology which adds �growl� as it is turned up. 12-Master: Controls the output level of the amplifier. 13-Effects Loop: Send and return jacks provided for the insertion of effects after the EQ, but before the boost section. Some effect units have gain, turning the BOOST down, will compensate for this. 14-Tuner Output Output comes directly off the input stage and can be patched to a tuner with a shielded patch cord. This output is unaffected by the Tuning Mute Feature. 15-Power/Protect LED: The LED is red at turn-on for five seconds while the amp powers up. The LED turns blue when the amp is ready to play. Should the amp experience a fault (over heat, over current) the amp will mute and this LED will switch to red until the condition is corrected. This LED turns off when the power switch is turned off. 16-Power Switch: Turns the amplifier on or off. Should a problem occur during operation press this switch out first. This turns the amp off, but does not completely disconnect the power from the AC mains. The power LED should be off at this point.
10
|
|
|
> |
|